Creating and Sending eSignature Requests
You can generate signing requests (DocuSign refers to these as an Envelope and you will see references to the Envelope ID and Status in the fmESignature Link file) in a number of different ways:
1. Contacts: from the Contact Details screen you can click the Create New Signing Request button to generate a new Request record with the Contact added as the recipient. You then need to select the Template for this Request and add any additional recipients.
2. Templates: from the Template Details screen you can click on the Template Request tab and then click the New Request button to create a new Request for the selected Template and then add your recipient/s.
3. Requests: from the Request Details screen you can create a new blank record and select the Template and add the recipient.
You will also need to specify the Account record you wish to use for the Request (if you have specified a Default Account it will default to that Account record). When sending a Request only Templates that are associated with the same Account record will be available for sending.
Request Details
A Request that has been sent will look like the following screenshot:

Request ID: this is generated automatically by the fmESignature Link file to uniquely identify a record.
Account: you select the Accounts record that you wish to associate with this Request. Only Templates that are associated with the same Account record will be available for sending.
Template: select the Template you wish to use for this Request (only Templates that are associated with the same Account record will be available).
Email Body: allows you to customise the email body that is used in the Docusign email when sending the request to the recipients. This will be populated with the Email Body from the selected Template record if present.
Email Subject: used for the email subject that is used in the Docusign email when sending the request to the recipients. You must enter an Email Subject for each Request. This will be populated with the Email Subject from the selected Template record if present.
Disable Responsive Document: when checked the responsive document feature is turned off for the envelope.
Log Envelope Request: when checked a copy of Envelope Signing Request JSON sent to DocuSign will be stored (useful for debugging purposes). You can view this on the Envelope JSON tab.
Completed Event Webhook: to receive a Webhook notification when the Envelope has been completed (signed by all parties) enter the webhook URL here. The url must start with https. This will be populated with the Webhook URL from the selected Template record if present.
Envelope ID: the Docusign ID assigned to the sent Request. This is automatically populated when a request is sent successfully.
Date Sent: the timestamp when the Request was sent successfully (this is automatically populated).
Envelope Status: the Status in Docusign of the Request/Envelope. The most common statuses you will see are:
- Sent: The email notification has been sent to at least one recipient. The envelope remains in this state until all recipients have viewed the documents. (Shown in Reports and History only)
- Delivered: All recipients have viewed the documents.
- Waiting for Others: The envelope has at least one recipient who has yet to complete their action.
- Completed: An envelope is completed once all of the recipients have completed their actions.
- Expired: A document that has exceeded its set expiration period without completing will expire. Recipients can no longer view or sign the expired document.
Last Status Check: the timestamp when the Status was last checked.
Scheduled Sending: to schedule sending of this Envelope enter the date and time you wish the Envelope to be sent in your local time zone.
Custom Expiry/Reminder Settings: allows you to specify values for custom expiry and reminder settings. You must enter values for ALL fields to use the custom expiry/reminder settings. These will be populated from the selected Template record if present. You must enter values for all fields to use the custom expiry/reminder settings. You can set values for the following:
- Expire After: enter an integer that sets the number of days the envelope is active
- Expiry Warning: enter an integer that sets the number of days before envelope expiration that an expiration warning email is sent to the recipient. If set to 0 (zero), no warning email is sent
- Reminder Delay: enter an integer specifying the number of days after the recipient receives the envelope that reminder emails are sent to the recipient
- Reminder Frequency: enter an integer specifying the interval in days between reminder emails
Last API Result: stores for last response from the Docusign API when making API calls related to this Request. You can also click the Last API Response Details popover button to view more details from the last API response.
Recipients Tab: this is where you add the recipients (signers and carbon copy) to your Request before sending. Depending on the Template you use you will need to add one or more recipients to your Request before sending. To add a new Recipient to your Request click the Add Recipient button and select a Recipient from the list of Contacts.
If the selected Template for the Request is a Docusign Template you will also need to select the Role for each Recipient - you will be able to select from a drop down menu showing the associated Roles for the selected Template.
Additional Recipient Settings are available by clicking this popover button:

which opens the following popover:

Access Code: add an access code for the recipient (see this article for further details on Sending Requests with Access Codes)
SMS/WhatsApp: indicates if this Recipient is to receive SMS or WhatsApp Notifications (see this article for further details on SMS and WhatsApp Delivery Notifications)
ID Verification: indicates if this Recipient is required to perform Identify Verification
Resent Request to Recipient: click this button to resend the signing request to this Recipient
Once a Request has been successfully sent and you have the Docusign Envelope ID you can also download the status for each Recipient as well as the Recipients List. For the list of Recipient Status options and what each of these mean please refer to the Recipient status codes page on the Docusign website.
Sent Documents Tab: this displays a record for every Template Document that was sent for this Request. If the Template Document was a PDF generated from a FileMaker layout a copy of the PDF will be stored in the Custom PDF container field which you can save to your desktop.
Form Data Tab: you can download the raw Form Data for this Request from DocuSign by clicking the Get Completed Form Data button.
Audit Events Tab: you can download the Audit Events for this Request from DocuSign by clicking the Get Audit Events button. You can also print a copy of these using the Print Audit Events button.
Envelope JSON Tab: this stores the last Envelope Signing Request JSON that was sent to DocuSign when the Log Envelope Request option is checked (useful for debugging purposes).
Send On Behalf Of
When you create a new Requests record and select an Account that uses the JWT Grant authentication method you will see another field named Sender User ID highlighted below:
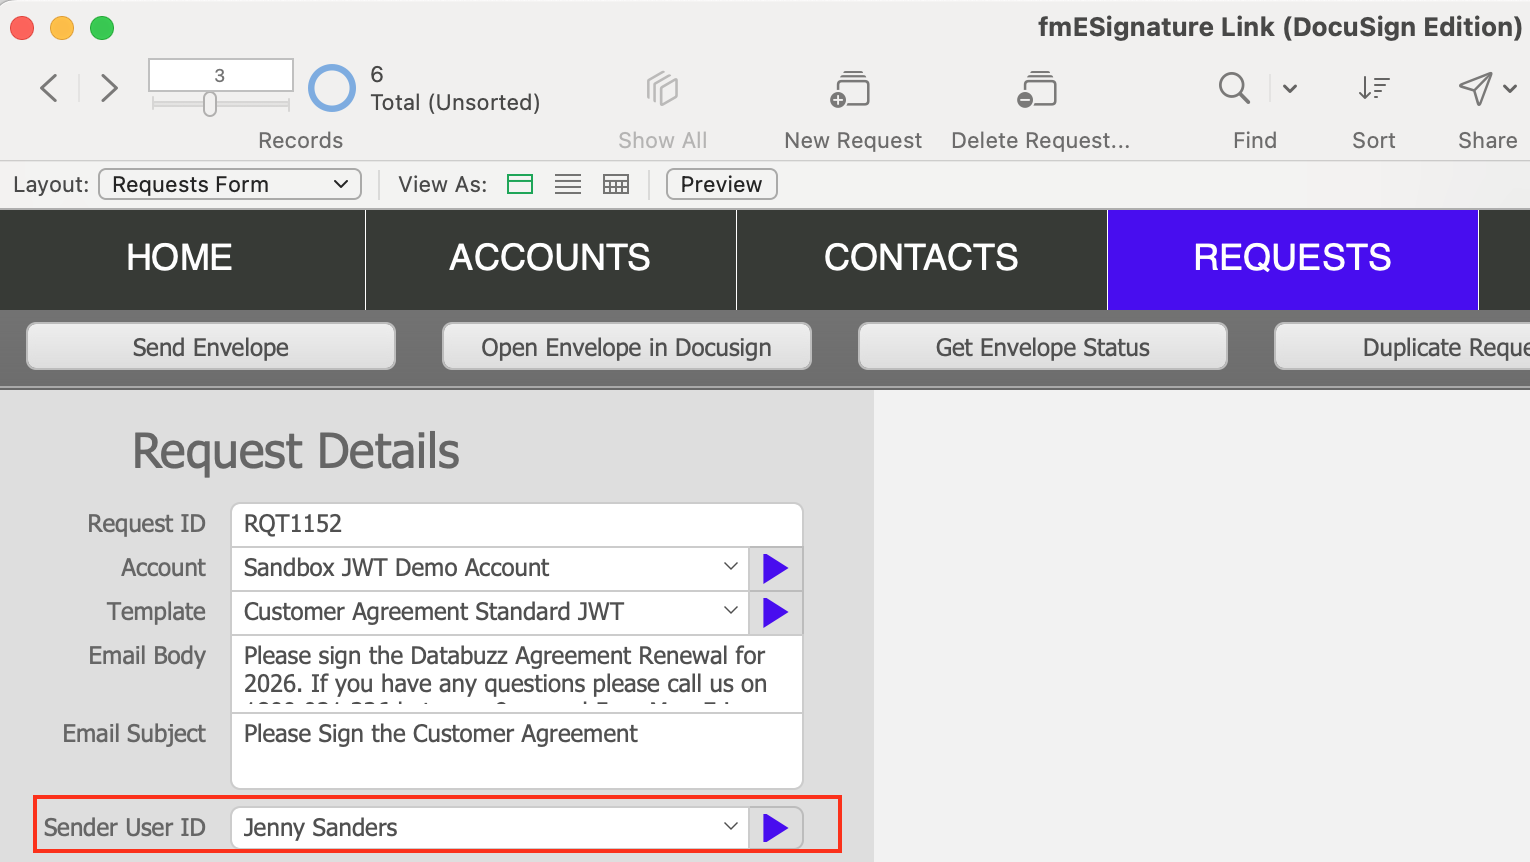
You can select a different Sender from the drop down menu. When you send the envelope it will use that User as the Sender instead of the default user that performed the initial authentication (as long as that user has granted consent and you have generated an initial Access Token for their User record). It will also generate a new Access Token if required for that User. See the Sending Envelope Signing Requests On Behalf of Another User guide for further details on this feature.
Request Details Buttons
The buttons at the top of the Request Details layout perform the following functions:
Send Envelope: sends the Signing Request to all Recipients via the DocuSign API
Open Envelope in Docusign: opens the Envelope in the DocuSign Admin website (requires a value in the Envelope ID field)
Get Envelope Status: gets the current Status for this Envelope from DocuSign (requires a value in the Envelope ID field)
Duplicate Request: duplicate the Request including all Request Contacts.
Resend Envelope: resend the Envelope to all Pending Recipients
Void Envelope: void this Envelope in DocuSign (requires a value in the Envelope ID field)
Send Request via Server: send this Signing Request via FileMaker Server using Perform Script on Server
Downloading the Completed Signed PDF
Once an Envelope has been signed by all parties ((you will typically get notified via email to your admin email address from DocuSign that this has happened) you can download the completed signed PDF from Docusign (you can also use Webhooks to have these pushed automatically to the fmESignature Link file). To download the signed PDF file click the Download Signed PDF button which downloads the PDF file into the Signed PDF field in the fmESignature Link file.
If the Include Certificate checkbox is checked the envelope signing certificate is included with the downloaded PDF. You can click the Preview button to preview the downloaded file in a FileMaker popup window. You can save the downloaded file to your desktop by clicking the Save to Desktop button.
We have some short videos demonstrating sending signing requests using a Docusign template and a non Docusign Template -check out the videos page to view these videos.